I didn't have very much time this week to do any crafting or sewing so, today's tutorial is just a fun and super quick way to add a bit of pizazz to your holiday tables.
I got the idea from a Kirigami book I bought awhile ago. Kirigami is sort of an adult version of making the snowflakes that we used to do in elementary school. Kirigami can get really complicated and can result in some incredibly intricate silhouettes that you can use for all sorts of things from stencils, to art, to....paper coasters.
Today we'll start with an easy fold and an easy pattern. For this project I used a fairly heavy handmade paper but this works much better with something not so thick. (Origami paper works well too!)
Here are the supplies that you'll need:
Steps:
1)Cut paper into 6" X 6" squares (15 cm X 15cm)
2)Using one square at a time, fold the paper into a triangle
3)Bring the bottom corner up to the top corner and fold again, to create a smaller triangle
4)Fold the top corner down to the bottom one to create an even smaller triangle
5)Now fold back the top layer of the triangle to meet the back
6)With a pencil, lightly draw a pattern onto the paper similar to the below, making sure that the squiggle touches the edges and folds in spots.
7)Cut along your lines with sharp scissors, making sure to not to cut the curves that touch the edges
8) Open out to see what you made!
Add a wine glass and you're ready to rock...or dine elegantly, whatever your style is. It doesn't hurt to give it a little press with an iron first.
who once again sent me the most people through her very popular linky party. Check out her site for more fun stuff throughout the week.
Don't forget that Tuesday, November 30th is your last chance to get your name in on the giveaway. All you have to do is sign up as a follower and leave a comment on theDesk Setpost to let me know which prize you'd like if you win.
As always, I'll be posting this project, along with this week'sShow and Tell,
on the linky parties throughout the week. Check out the linky party tab at the top of the page for more fun projects!
I was in Ottawa this week and had hoped to get you a nice inspirational picture of the Parliament buildings. Unfortunately, there was a misty grey wet fog hanging in the air and all I could capture on film was a big grey haze.
I knew there was a chance of this happening so here's what I set up in my back pocket just in case I couldn't get you the shot I wanted.
I don't know if it's inspirational...but you have to admit, it is kind of funny.
I'm sure any of you who are sewers are familiar with the burdastyle site. It's an amazing place to get sewing tips, free (and/or inexpensive) patterns, advice, and showcase your own projects.
Right now they are holding a contest...and I entered! It's sponsored by Bernina and the grand prize is, of course, a sewing machine. It's called "Party Through the Decades" and each submission has to choose their favourite decade and submit an inspiration board as well as a photo of their project.
If you've read my "About Me" blurb on the sidebar you can easily guess what decade I chose...the 1970's of course! And I was completely inspired by Halston, one of my favourite designers of the decade.
My inspiration board is a mix of classic Halston along with the newer Heritage line:
And here's my creation:
Part of the submission is to give a short blurb on why you chose the era that you did. Here's what I wrote:
"I love everything about the 70’s. It was a decade when glitz and glam were the everyday norm. I’m especially drawn to Halston and the beauty in the simplicity of the shape and movement of the fabric that he was able to capture.
This piece appears simple but to attain such simplicity one must achieve perfection in each and every stitch, otherwise it shows. The beautiful olive green colour adds to the elegance and sophistication as does the authentic era belt.
All the “it” girls of the era wore Halston. They, and their clothes, epitomized the jet set lifestyle. I hope that you can see the Halston influence in my creation and I can’t wait to wear it!"
You can check out the other submissions by going here . And you can check out my projects page here . I don't know if number of views and number of time favourited matters in the decision making...but it probably wouldn't hurt.
Once you see all of the amazing submissions you'll probably agree that I don't really have a very good chance of getting too far in the competition, but it was still fun, and it was a good incentive to get me to make something special to wear for the holidays! Now I'm ready to party all Christmas season long~
Yeah! My goal at the beginning of November was to get 50 followers by the end of the month and guess what??? You guys helped me to achieve my goal! Thank you so much everyone!
And because we reached that goal I can do my giveaway! How much fun. There's still a week left to enter, just sign up as a follower and leave a comment on the Desk Set: The Rest of the Story post. The last time I checked there were only 14 comments (and one of them was mine) so you're chances of winning are very good.
I'll make the draw on November 30th. Make sure to come back to see if you won!
Thanks again everyone for helping me to achieve my goal. I hope you're all having fun crafting along with me. There'll be lots more great projects coming up every week~
All right! By now everyone should've eaten all of their ice-cream and have their Spool Knitters ready to go. Let's get started!
All you need for this project is your spool knitter and a ball of soft, fluffy wool.
This week I'll show you all the steps through three videos. I'll post a summarized version below step by step for those of you who aren't able to watch the videos, but it will probably make more sense in real time:
Setting Up:
Tips:
Casting off:
Summary Steps to make a flat scarf:
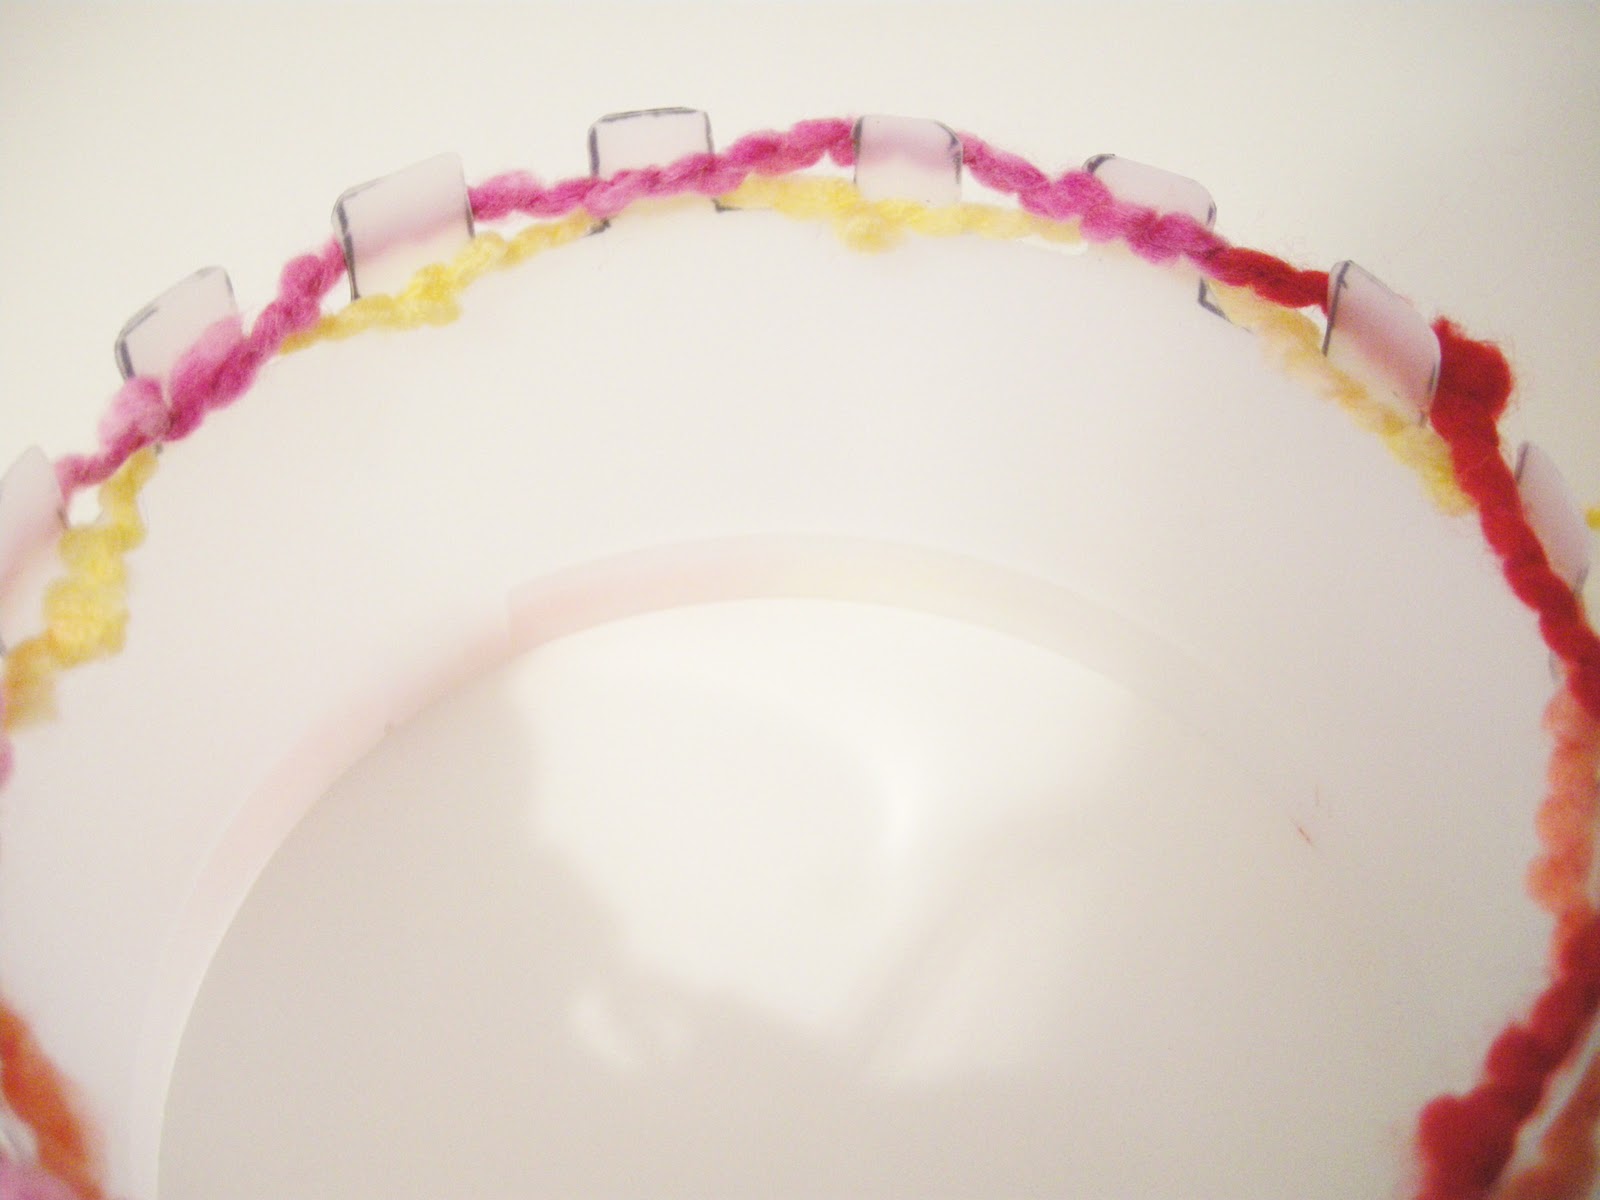
1) Choose one section as your starting point (it doesn't matter where). Weave your wool in and out of each section, stopping when you get to the last section. Loop around last section and wind back to the beginning, making sure each section now has one line of wool in front and one in back.
2) Now you should be back at your first section, loop wool around. It should be sitting in front of the second section. There are now two lines of wool in front of section two. Gently pull the piece that's on the bottom over top of the top line of wool, and over the section, placing it behind the section.
3) Now you're spool knitting! You just keep repeating this step on each alternating section. When you get to the end wind around and continue, never knitting on top of the same section twice. (sorry, the rest of the shots are going to look a little funny because they're screen grabs from the video. I got so into knitting that I forgot to take photos!)
4) Eventually it starts coming out the bottom of your knitter. Don't worry that it's stretched out at the top, it naturally tightens up.
5) When you get near the end of your wool you'll need to cast off. First make sure you have enough wool left to run around the knitter once. Don't cut anything, just wrap it around to make sure you have enough.
6) Now that you know you do (if you don't, just unloop one row of stitching), you will simply loop the wool under each section. Don't miss any sections this time. This will secure it so that it won't unravel when you take it off the knitter. Once you get to the last section you can gently take the scarf off of the knitter. Pull the tail to tighten up the end and make it the same width as the rest of the scarf. You can stretch and pull the scarf a little to even it all out.
7) Just weave any tail that's left over into the scarf and secure with a knot. Voila! You're done! And probably in record time!
Some tips:
-Control your tension by gently tugging on the wool in front of the section that you just looped over.
-It doesn't matter how many sections you have, it will always work.
-If you have arthritis or other aches in your hands, try using a crochet hook to do the looping for you.
I really hope that you're able to watch the videos because it's so much easier to follow that way. In any case, have fun with this, try different types of wool, or different sizes and shapes of spool knitters. Add a fringe on each end for something extra. (Just cut pieces of wool approximately 8"long, group into three's, fold in half, and loop into each hole that runs along the ends.)
Leave a comment and let me know how you get on with it (no goofy jokes aboot my Canadian accent, eh~). These make lovely Christmas gifts that are fast and easy to make but still have a very personal touch. If you want to learn more stitches or how to make other projects with your spool knitter make sure to let me know and I'll do other video posts throughout the winter.
Happy knitting!
Don't forget to enter my giveaway! Just sign up as a follower and leave a comment on the Desk Set: The Rest of the Story post, link is in the sidebar.
(There are only 14 comments so far so your chances of winning are really good!)
Thanks to Between Naps on the Porch for sending so many visitors my way this week. Go visit Susan and check out the other fun ideas and projects there.
I'll be posting this project at the linky parties throughout the week so make sure to check out the tab at the top of the page, including TCB .
This is sort of a random Show and Tell. I almost forgot that I had these funny little flower things hidden away in my craft closet.
I made them ages ago with yet another gadget I got from Japan. As usual, I had big plans to make all kinds of things with these and then just got distracted by some other new, sparkly thing.
As you can see by the package, you can use ribbon or fabric or other kinds of trims to make the flowers.
I always seemed to use this crochet yarn stuff though. I'm very drawn to anything variegated.
I used to make them all the time while watching TV, hoping to have a stack some day big enough to make something really substantial. What I was waiting for...I don't know.
I was going to make these ones into a (lined) bikini top.
I thought about using them as embellishments on the yoke of a top or stringing them together to make straps or little cap sleeves for a shell. But, again...I never did get around to it.
Now I'm imagining them in a bib necklace with some beads and lace attached.
What do you think? Can you think of any uses for these things? Leave me a comment with your great ideas so that I'm inspired to get my behind in gear and make something with them already~
Don't forget to enter my giveaway! Just sign up as a follower and leave a comment on the Desk Set: The Rest of the Story post. (There are only 14 comments so far so your chances are pretty good!)
I'll be posting at the linky parties, check them out at the tab above!